
As stated previously, I want to give a guide/tutorial on unit/dungeon modding. Here it is. I finished the draft in the morning and then I was occupied with some administrative stuff in the afternoon, so the guide might be a bit rough on the edges. But then I think the unit/dungeon modding is something that quite a few people are interested in doing, so I decided to release it now.
NOTE: THIS REQUIRES V4.8.1
Here is the complementary example dungeon mod with it's own unique units and items: Here.
Below is the guide in case something happens to the google doc. WARNING: VERY LONG.
V4.8.1 introduced unit and dungeon modding. I think this is a very powerful addition to the game. People have different tastes and they might prefer different kind of gameplay. Some may want to feel powerful and bulldoze their way through waves of weak enemies, others may have a distaste for hordes and want fewer, but tougher enemies, and there may even be others who want near impossible dungeons only to watch the hero/heroines to meet their bad end. Suffice to say, it is very difficult for me to address the needs of all, and fortunately, I don’t have to do it alone. With Unit and Dungeon modding, it is now possible for the community to create the kind of experience they are interested in, and I do hope this feature get used.
PART I: JSON CRASH COURSE
Like all previous modding feature, the unit and dungeon modding is done through (creating and) editing .json files. I think many people had some difficulties with getting the JSON syntax right so it might be worthwhile to include a short guide on JSON:
Essentially, JSON file is made up of three components: Values, Lists ([]) and Mapping ({}).
Value can be thought of as data. So things like numbers: 1, 2, 5.23, 3.14, and strings (letters/words): “apple”, “id”, “etc”. Note that the strings are enclosed with “ “ parentheses. This is because 1 and “1”, although both are Values, are not the same thing to the computer.
A List is an ordered collection of values enclosed by square brackets ([ ]). Something like this: [1,2,3,4,5] or [“a”, “b”, “c”, “d”]. Note that each value is separated with a comma (,) and there is no comma on the last value: [1,2,3] and NOT [1,2,3,]. This is a very common source of bugs.
A Mapping is an unordered collection of Key-Value pairs enclosed by braces ({ }). Something like this: {1:”a”, 2:”b”, 3:”c”}. Note that each data point is a pair separated by colon (:) that represents a relationship. Note the last elem doesn’t have a comma either.
Remember what I said about Values being data such as number and letters? Well, I kinda lied. Because collections, such as Lists ([]) and Mapping ({}) are values as well. And you can chain them together. For example: A List of List: [[1,2,3],[4,5,6]], a Mapping of Lists: {1: [“a”,”b”], 2: [“c”,”d”]} or whatever else you can come up with.
And so that concludes the crash course on JSON. If you are getting JSON parsing failed errors, it is recommended that you copy and paste the JSON into a validator such as this one: https://jsonlint.com/. It will give you much nicer messages on where the error occured.
PART II: UNIT MODDING
Now, onto the actual Modding portion. To make things easier, I provide a complementary dungeon mod with it’s own unique enemies. You can download it >>HERE<<.
The first change that you might noticed is that the _FilesToLoad.json now supports loading of “unitFiles” and “dungeonFiles.” As you might have guessed, they are used to define new unit types and new dungeons.
Let’s start with “unitFiles.” Under _FilesToLoad.json, you see that the “unitFiles” is pointing to a List of unit files to load. And there is only one unitFile to load in this particular mod, “unit_data.json.”
When you go back to the mod folder, and indeed, you will find a json file named “unit_data.json.” Open it.
It may look something like this:
( Opened via Sublime Text )
Now, now, before you panic, take a deep breath and trying to remember what we learned about JSON. The first symbol you see is [ and it should immediately tell you that it is a List of something. If you go to the end of the file you will see the matching ending ] that marks the end of the List. In between, it’s a lot of something, what do they all mean?
Remember that a List is a sequence of Values that is separated by comma. It looks something like this: [Value, Value, Value, Value]. Aha! So we just find the next comma and interpret everything in between as the Value? Not quite. Because a Value can be arbitrarily complex and a Value can be another List with commas, so the next comma isn't necessarily THE comma that we are looking for.
A keen reader might notice that the next symbol is { and therefore we expect a Mapping. And he/she might find the ending symbol } at line 43 and take that to mean the end of that Mapping, And hence everything in between the { and } is a Value, of something.
That would be exactly right. I like to take a moment here to introduce the idea of indentation. It is used here to indicate the end of a collection. This is important because it will help us to find the correct end of a List or Mapping. Don’t believe me? Remove all the spaces and see for yourself.
So now we established that the file is a List of Mapping with the basic structure that looks something like this: [{....}, {....}]. And we see that under each Mapping, contains some key-value pairs that looks like the parameters for an unit. And that would be exactly right.
Let’s go over the parameters:
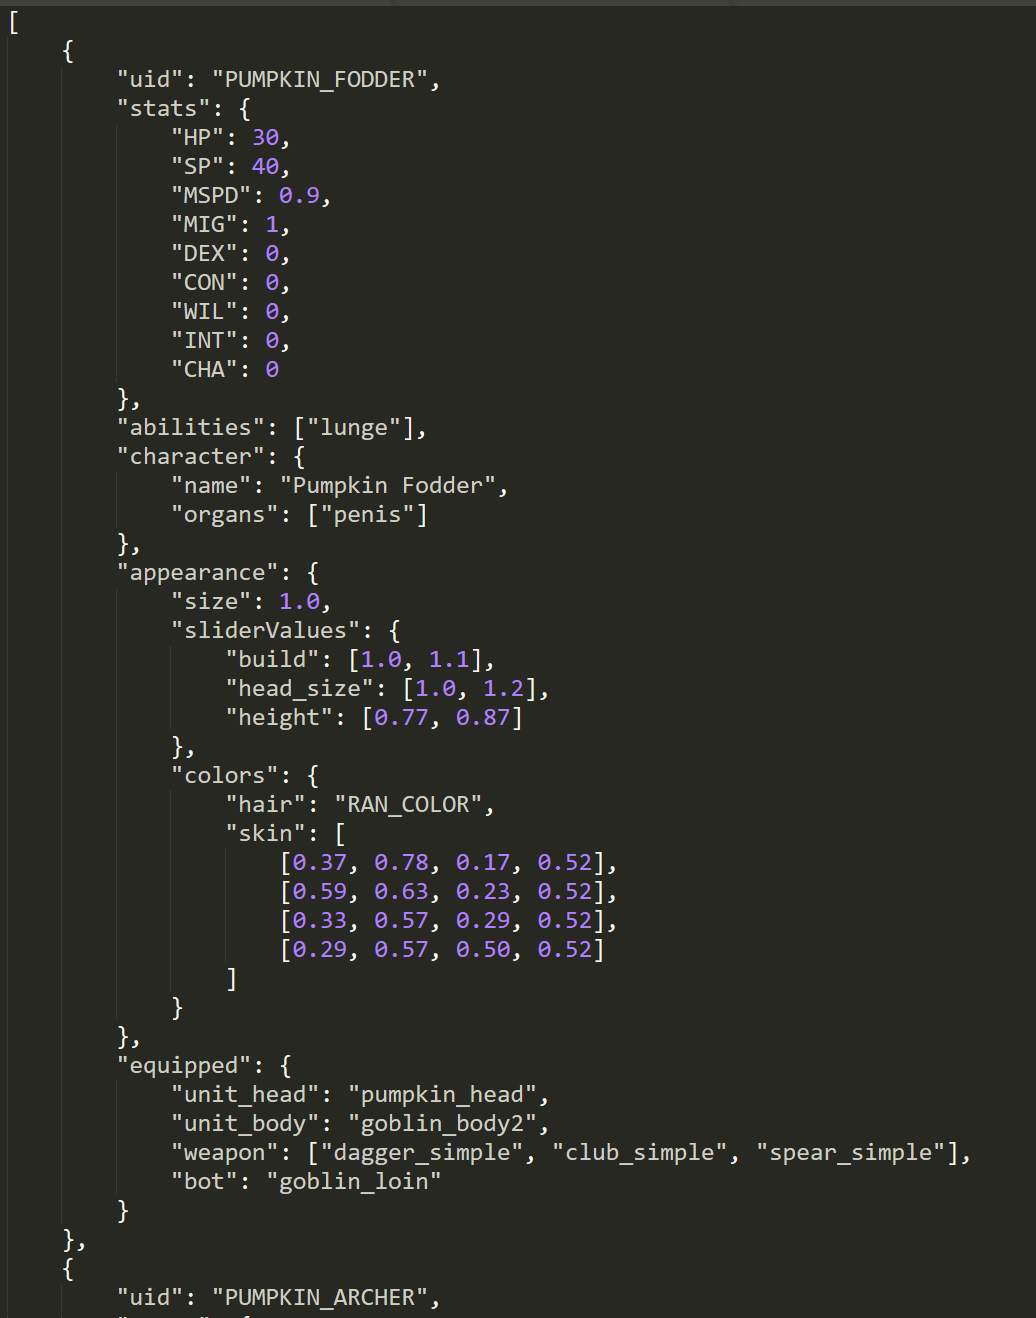
{
“uid”: “YOUR_UNIT_ID”
}
The most important parameter is the “uid” or the Unique Identification for each unit. This is how other files can refer to the unit data in question. All Units (and anything else, really) must have an UNIQUE identification. Emphasis on UNIQUE. If two mods both define a unit each (so 2 units defined in total) that have the same “uid”, then it means the mods are not compatible with each other. Because they have violated the “uid” uniqueness predicate. My recommendation for this is to always extend the “uid” of your mod by the mod folder name. This is because the mod folder name must be unique, hence it guarantees that the “uid” will be unique as well. (Yes I know I didn't do it for this example mod, this is a situation of “do as I say, not as I do.”)
Next, the “stats” parameter:
{
"stats": {
"HP": 30,
"SP": 40,
"MSPD": 0.9,
"MIG": 1,
"DEX": 0,
"CON": 0,
"WIL": 0,
"INT": 0,
"CHA": 0
},
...
}
It should be fairly obvious what each of these do, with 2 things to keep in mind: The first is that the HP and SP (stamina) values are the base value before any Stat (like Con) and Equipment takes into effect. The second is that for the Stats themselves, they represent a change from the base stat. So for example, a “MIG” stat of 1 in the data file is actually a might of 11 in game.
The “abilities” tag is a List of all the Abilities that particular unit can do. There are not many abilities implemented in game currently. Just “lunge”, “place_trap” and “cast_curse”. As an example, if you want the unit to do everything, change the line from "abilities": ["lunge"], to “abilities”: [“lunge”, “place_trap”, “cast_curse”].
The “characters” tag represents some misc information regarding the character. If you want to change the “name” of the unit, change the “Pumpkin Fodder” right after “name” to something else. If you want the character to have a penis (perhaps as a futa) add a "organs": ["penis"] line otherwise leave it as empty.
The “appearances” tag contains information regarding the unit’s appearance. It includes thing like overall size, the colors, the individual slider values. I just want to add that the colors are a 4 element list eg, [0.37, 0.78, 0.17, 0.52] representing R,G,B and Smooth channels. And the slider values can either be a single number of a List of 2 numbers, eg [1.0, 1.1]. The list of 2 numbers means a range and the game will randomly take a number within the range.
Next is “aiParems” parameter. (PUMPKIN_FODDER doesn’t have any, PUMPKIN_ARCHER has). This determines what kind of actions the AI is allowed to do. For example, the PUMPKIN_ARCHER can do both “restraint” and “carry” whereas PUMPKIN_FODDER can’t do anything.
Finally, we have the “equipped” tag to define which items the unit is wearing on each slot. The item Ids must be valid or it will cause a bug. Most likely causing that slot to be invisible / nothing there. A single itemId, like “pumpkin_head”, means that unit will always use that item on that slot. A List of ItemIds, like "weapon": ["dagger_simple", "club_simple", "spear_simple"], means to pick one at random. It is possible to have this random picking to be weighted as well. For example, if you want the unit to use “dagger_simple” much more often than “club_simple,” you can do it by something like this: "weapon": ["dagger_simple", "dagger_simple", "dagger_simple", “club_simple”].
If you want a slot to optional, that is, sometimes the unit will use the item, and other times not, you can do so via nulls. For example: "weapon": ["dagger_simple", null]. Note: null is a special variable and there is no “ “ around it!
PART III: DUNGEON MODDING
Now let’s move onto dungeon modding. First of all, a couple of words. The dungeon gen is an very old feature, created near the game’s infancy. The goal back then was to get the game functional ASAP so the dungeon gen is fairly basic. The dungeon modding system uses the same dungeon gen as the game. As such, it is subject to all the limitations. For example, you cannot use it to handcraft an intricate, complex level to play in. It is only capable of generating mazes made up of rooms and hallways.
For the example dungeon, I want there to be 3 different units: a melee enemy, a ranged enemy and a tougher enemy to serve as the boss - the “PUMPKIN_FODDER,” “PUMPKIN_ARCHER” and “PUMPKIN_BOSS” that I created via unit modding. All these unit have an unique feature: they have pumpkins as their heads. To do so, I created a new item, the “pumpkin_head” through the item modding feature that the game had. I place all these dependences, the item “pumpkin_head” mesh data, (/meshes/pumpkin_head.json), the actual item definitions, (/item_data.json) and the unit data (/unit_data.json) all into the same folder. This is so users can just drag this folder into the mod folder and everything will work. Furthermore, when I need to edit the mod in the future, I have everything there for easy reference.
MODS THAT DO NOT CONTAIN ALL THEIR DEPENDENCIES ARE ILL-FORMED. Unfortunately I don’t have a way to check/enforce this in the game, if I could (perhaps in the future), I will prevent the loading of any mod that fail to meet this basic requirement.
Onto the dungeon data itself, open “dungeon_data.json” and it may look something like this:
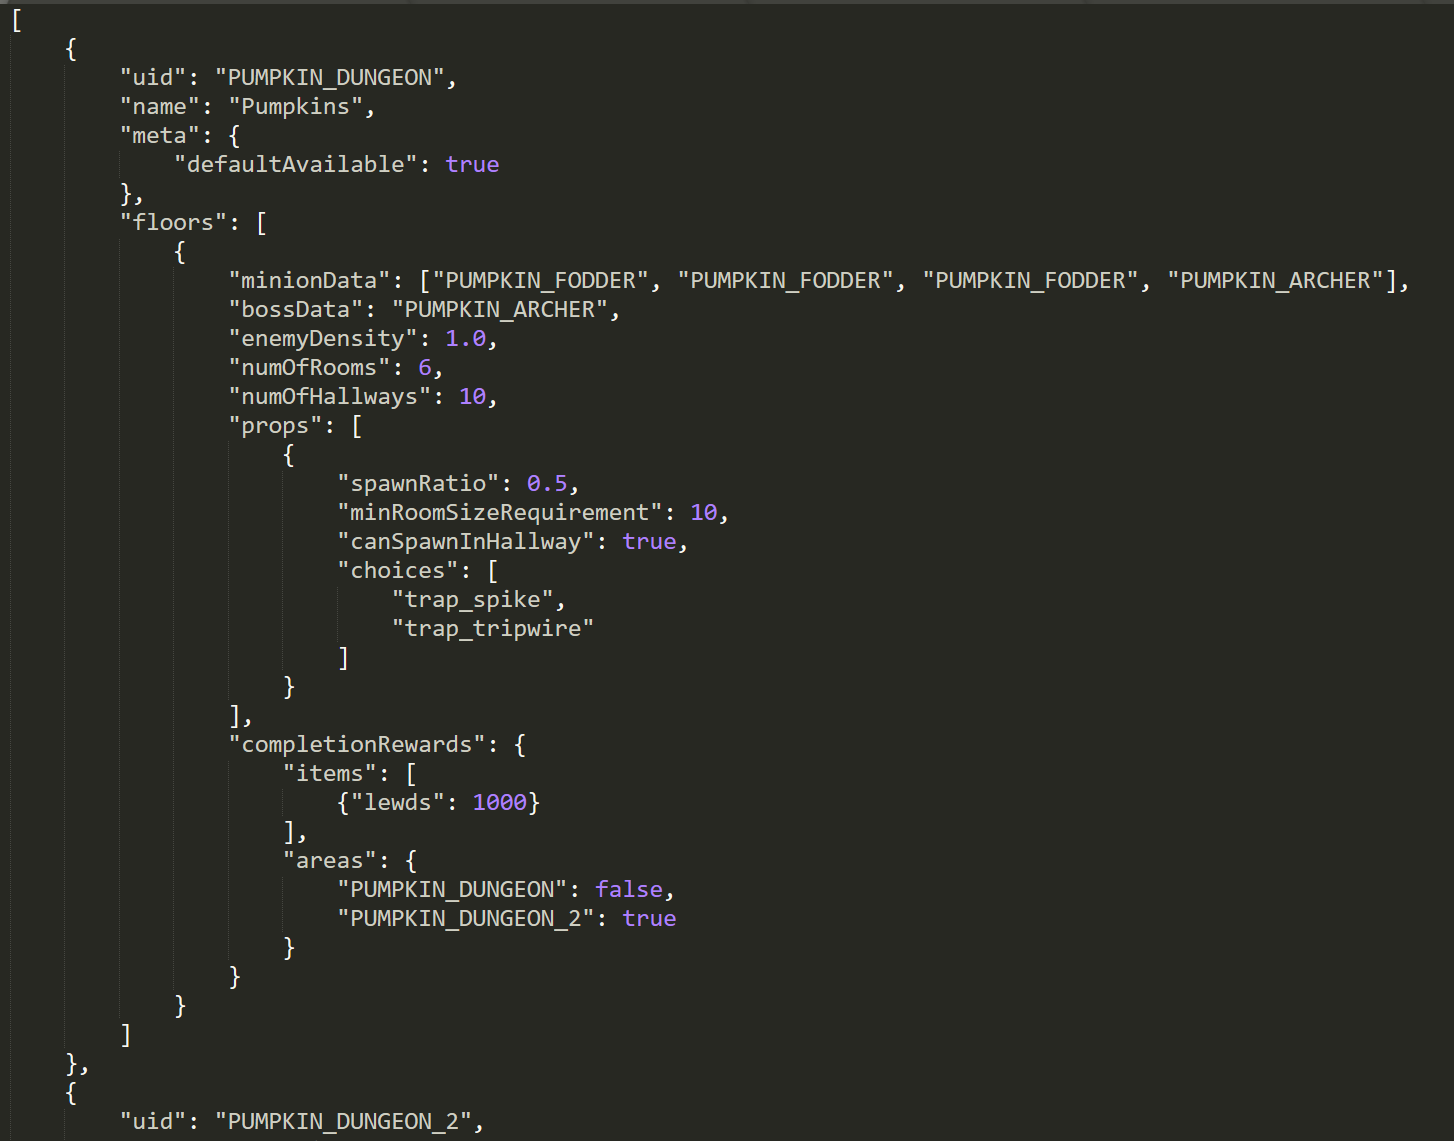
It probably should look familiar. It is a List of Mappings again, where each mapping represents a different dungeon. Note that there is “uid” as well, and like units, all dungeons must have their own unique id. And likewise, it is suggested that you prefix this uid with something like the mod folder name to avoid uid collisions.
The “name” parameter is what the game shows when the “where to” prompt shows up, but the “uid” is how the game references to each other internally. Notably, “name” doesn’t have to be unique. It is totally possible to have 2 different dungeons with the same name. This have a couple of applications.
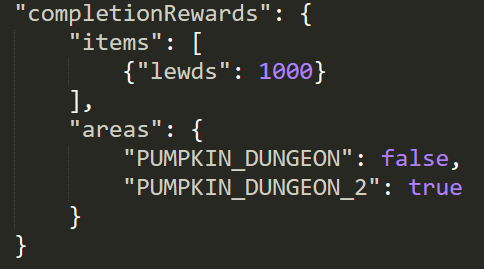
Next under “meta” there is a very important property. The “defaultAvailable” tag. This indicates to the game whether this particular dungeon should be available by default. If this is false or the flag missing, then the player can not access the dungeon until some other thing grants access.
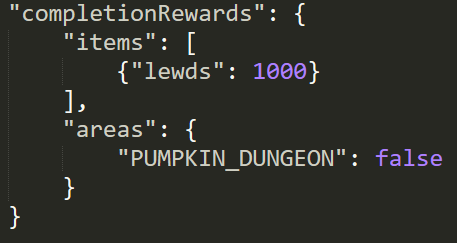
This is useful for things like implementing a series of dungeon floors that the player have to go through in order. This technique is shown in the example mod. “PUMPKIN_DUNGEON” is available by default, but “PUMPKIN_DUNGEON_2” is not. Only when the “PUMPKIN_DUNGEON” is finished, then “PUMPKIN_DUNGEON_2” becomes accessible. At the same time, access to “PUMPKIN_DUNGEON” is closed. This data is set via [“completionRewards”][“areas”]:
Next is the “floors” parameter. The “floors” parameters are what get passed into the dungeon generator to generate the dungeons. It determines the size of the dungeon, what enemies spawn there, the amount of enemies, etc.
Note that the “floors” is a List itself. This is because a dungeon can have multiple floors. And the player must go through them in order. The data is organized like so:
“floors”: [
{
// floor 1 data
},
{
// floor 2 data
},
...
]
The “numOfRooms” and “numOfHallways” determines the approximate size of the dungeon. The more rooms and hallways there are, the bigger the dungeon. I dont recommand huge dungeons tho, as the game lacks a map feature and all the rooms/hallways can look very alike, so it’s extremely easy to get lost.
Under “minionData”, is a list of possible enemies. This uses the same random picking process as the equipment data, so you can use it in the same manner to change the frequency of each enemy type. Here, "minionData": ["PUMPKIN_FODDER", "PUMPKIN_FODDER", "PUMPKIN_FODDER", "PUMPKIN_ARCHER"] means that there will much more “PUMPKIN_FODDER”s than “PUMPKIN_ARCHER”s.
The “bossData” is what the enemy you will face in the final or boss room of each dungeon floor.
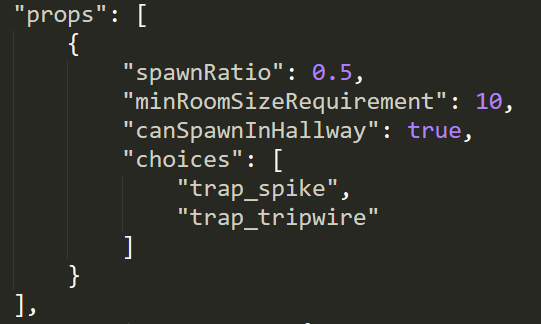
Under “props”, is the parameters for spawning things like Traps and Devices. It is a List ([]) as well. But here, it has a different meaning. It doesn’t mean to pick 1 of these randomly, it means that the dungeon will spawn everything included in the List.
This just spawn traps:
And this will spawn traps AND devices:

The “spawnRatio” determines the approximate number of props you will find per 100 tiles. The “minRoomSizeRequirement” means that the dungeon will only spawn props if the room size (in tiles) is greater the amount specified. The “canSpawnInHallway” determines whether the prop can spawn in a Hallway. Props can always spawn in rooms. And finally, under choices, is a list of propIds that the game will randomly pick from when a prop is spawned.
“completionRewards” is what the player will get when defeating the boss of that floor. Currently, it comes in 2 types: item rewards, and area unlock(and locks). I already explained how the “areas” parameters can be used to create a series of dungeons that the player must go through in order. The “items” rewards are what the player will find when looting the boss’s body. It is a List and so you can have the boss give multiple types of item rewards.
Here is another possible technique of interest. Suppose if you have some super awesome item that you only want to give out to the player once. This can be accomplished by having the boss give the item reward, while closing off the access to the dungeon. This is demonstrated in “"PUMPKIN_DUNGEON" where the first time the player play though it, they will get 1000 gold, but then the dungeon becomes no longer accessible:
That is pretty much the basis of the dungeon modding. Through it, you can create units of any type the game will allow, and fight them in the dungeon. It is also a way to get custom mod items to the player by having the enemies either equip them, or give them out as “completionRewards.” Of course, this meant that the player must not delete the mod!
Here is some “advanced” stuff. Ok, not really that advanced. Take a look at “PUMPKIN_DUNGEON_2”. You will notice that under “floors”, there are 2 entries, one for each floor of the dungeon. Floor 1 is nothing special, but floor 2 have 2 additional features: “waves” and “ambush.” What are they?
“waves” and “ambush” are the dynamically spawned enemies. Unlike the enemies in the room, they will have their AI set to “attackUnit” (unit being the player) rather than “attackPos.” As a result, they will not back off until either they or their target is defeated.
“ambush” are spawns that trigger whenever a door is opened. The spawn chance is well, determined by the “chance” parameters.
“waves” are spawns on a timer. Note that “waves” are a List, indicating that a dungeon can have multiple different waves that are on their individual timers. For each wave type, the “initialCD” stands for initial cool down, which is the amount of time before the first wave of this kind will spawn. This is a picked randomly in the range. Eg. [0, 30] means that the first wave will spawn in between 0 secs to 30 secs after the player enters the dungeon. The “spawnInterval” are the time in between wave spawns.
“spawnList” appears under both “waves” and “ambush”. It is List of enemy group that the game will pick at random when spawning.
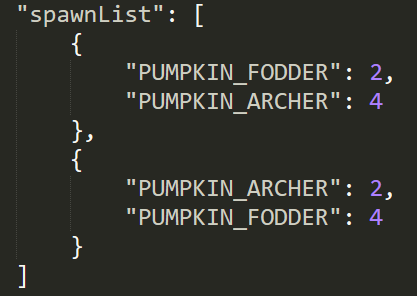
This means that the game will either spawn 2 FODDERS, 4 ARCHERS or 2 ARCHERS, 4 FODDERS.
This is terrific! Now a couple questions - what are the slider names for things like breast size? Also, what are the restraints (the hanging one and stockade) called in game?
ReplyDeleteit'd be nice if we could have the floor of dungeons changed from blue into those dark bricks, and maybe have a ceiling
ReplyDeleteWhy is there no download link even though it says ">>HERE<<"?
ReplyDeleteHmm any chance of getting a paw glove fist type weapon?
ReplyDeletewith the cat and demon outfit parts i can remake sharty from kamidori i just need paw glove fists to complete the cosplay since that is the weapon type she uses in game.
There is one item in the game that's a fist weapon, but it's super rare.
DeleteWhat is the id for human body and head? I want to change pumpkin units to human.
ReplyDeleteChange the body type to "human_female(or male)", and remove the unit_head line. You might have to add hair, though.
Deletemaybe its on my end but the breast fondling animation is busted
ReplyDeleteYup the breast fondle does not line up anymore.
ReplyDeleteWhat are the id values for the holding devices? E.g. horse, cross, stockade?
The guide is updated to include id values in the appendix at the end.
ReplyDelete